22 KiB
User Guide
This is the user guide for ONNX web, a web GUI for running ONNX models with hardware acceleration on both AMD and Nvidia system, with a CPU software fallback.
The API runs on both Linux and Windows and provides access to the major functionality of diffusers, along with metadata about the available models and accelerators, and the output of previous runs. Hardware acceleration is supported on both AMD and Nvidia for both Linux and Windows, with a CPU fallback capable of running on laptop-class machines.
The GUI is hosted on Github Pages and runs in all major browsers, including on mobile devices. It allows you to select the model and accelerator being used for each image pipeline. Image parameters are shown for each of the major modes, and you can either upload or paint the mask for inpainting and outpainting. The last few output images are shown below the image controls, making it easy to refer back to previous parameters or save an image from earlier.
Contents
- User Guide
- Contents
- Outline
- Tabs
- Known Errors
- Client Errors
- Server Errors
- Very slow with high CPU usage, max fan speed during image generation
- Connection refused or timeouts
- Error: name 'cmd' is not defined
- CUDA driver version is insufficient for CUDA runtime version
- Command 'python' not found or Command 'pip' not found
- AttributeError: module 'numpy' has no attribute 'float'
- Numpy invalid combination of arguments
- ONNXRuntimeError: The parameter is incorrect
- The expanded size of the tensor must match the existing size
Outline
ONNX models
The ONNX runtime is a library for accelerating neural networks and machine learning models, using the ONNX file format to share them across different platforms. ONNX web is a server to run hardware-accelerated inference using those models and a web client to provide the parameters and view the results.
Models are split up into three groups:
- Diffusion
- general models like Stable Diffusion
- specialized models like Knollingcase or OpenJourney
- Upscaling
- Correction
There are many other models available and specialized variations for anime, TV shows, and all sorts of other styles.
Modes and tabs
- txt2img
- generate a new image from a text prompt
- img2img
- modify an existing image using a text prompt
- inpaint
- modify parts of an existing image using an opacity mask
- includes outpaint
- upscale
- resize an existing image
Image history
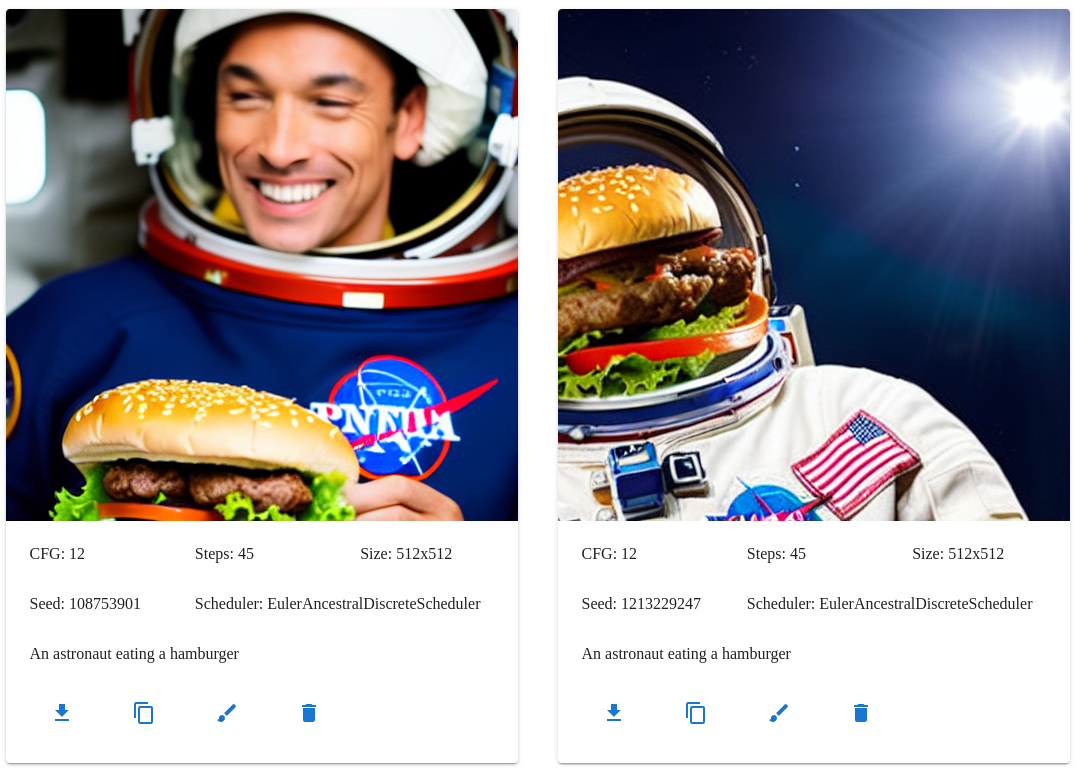
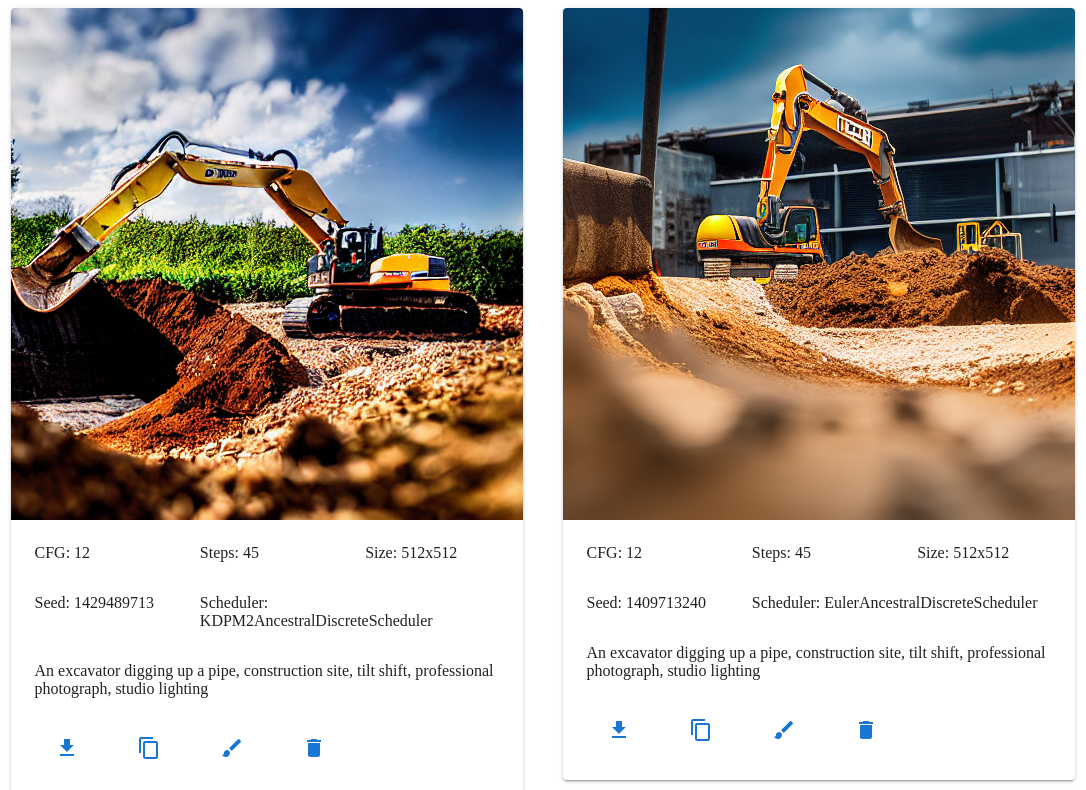
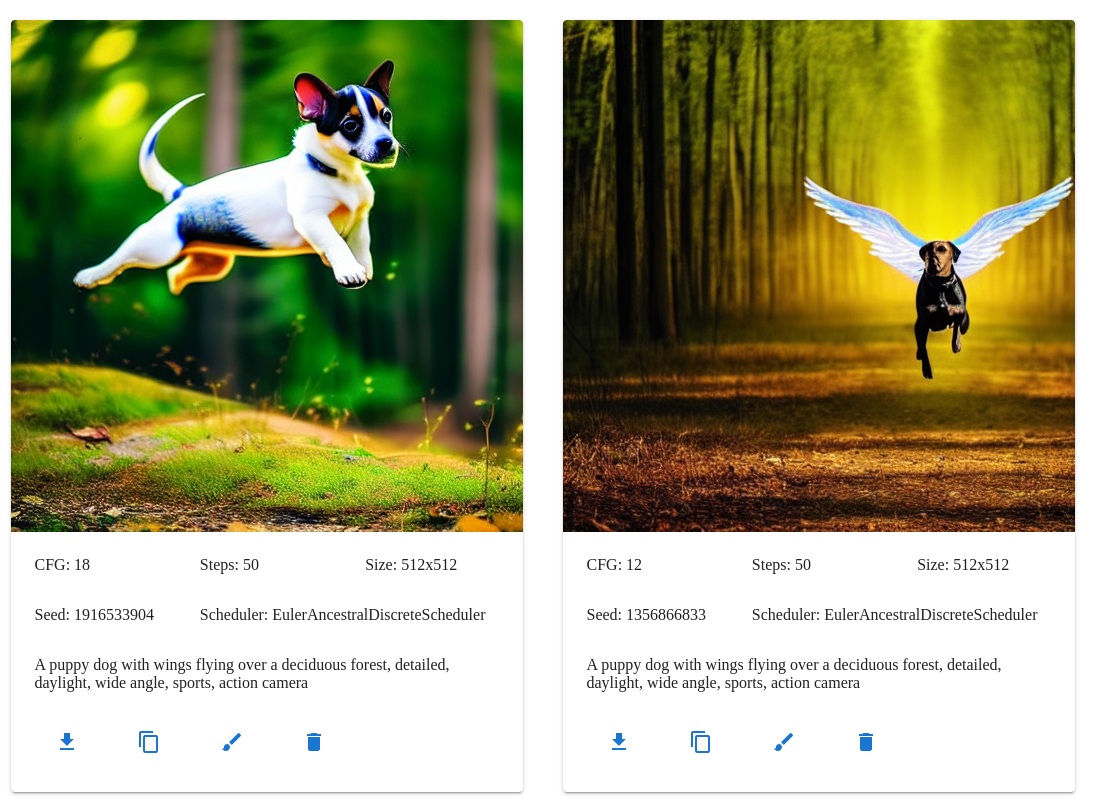
Below the tab control is the image history section. The image history setting controls the number of images that are shown. You can use the controls in each image card to download the output, copy to the source image parameters for img2img and inpaint, and delete the image from history if you don't like it.
Scheduler comparison
- https://huggingface.co/docs/diffusers/main/en/using-diffusers/schedulers#compare-schedulers
- https://i.imgur.com/2pQPgf0.jpeg
Tabs
Txt2img tab
The txt2img tab turns your wildest ideas into something resembling them, maybe.
This mode takes a text prompt along with various other parameters and produces a new image.
Scheduler parameter
This selects the scheduler algorithm used to resolve the latent noise into a coherent image.
See the scheduler comparison for more details.
CFG parameter
Classifier free guidance. How strictly the model should follow the prompt. Anything from 5 to 15 usually works. More is not always better, setting this too high can result in noisy, solarized images.
Roughly:
- 2-6 allows the AI to be creative
- 7-11 treats the prompt as a suggestion
- 12-15 strongly encourages the AI to follow the prompt
- 16-20 follows the prompt whether it makes sense or not
Steps parameter
The number of scheduler steps to run. Using more steps often results in an image with more details, but also takes longer to run.
The Euler Ancestral scheduler can usually produce decent results in 30-45 steps, while some of the others need 80-100 or more. Inpainting may need more steps, up to 120 or 150 in some cases. Using too many steps can increase the contrast of your image too much, almost like a posterize effect.
Seed parameter
The seed value used for the random number generators. This is a lot like the seed in a game like Minecraft and can be shared to produce similar images, but producing exactly the same image requires the same model, scheduler, and all of the other parameters as well.
You can use the same prompt and seed, while varying the steps and CFG, to produce similar images with small variations.
Using -1 will generate a new seed on the server for each image.
Prompt parameter
The input text for your image, things that should be included.
The OpenArt Stable Diffusion Prompt Book has a lot of useful tips on how to build a good prompt. You can include keywords to describe the subject, setting, style, and level of detail. Throwing a few extra keywords into the end of the prompt can help add specific details, like the color and intensity of the lighting.
A puppy dog with wings flying over a deciduous forest, drone, detailed, daylight, wide angle, sports, action camera
The models will not always follow the prompt exactly, even with a fairly large CFG value, and you may need to try a few times.
A stone magnifying glass with a leather handle showing a portal to another dimension, steam punk, etc
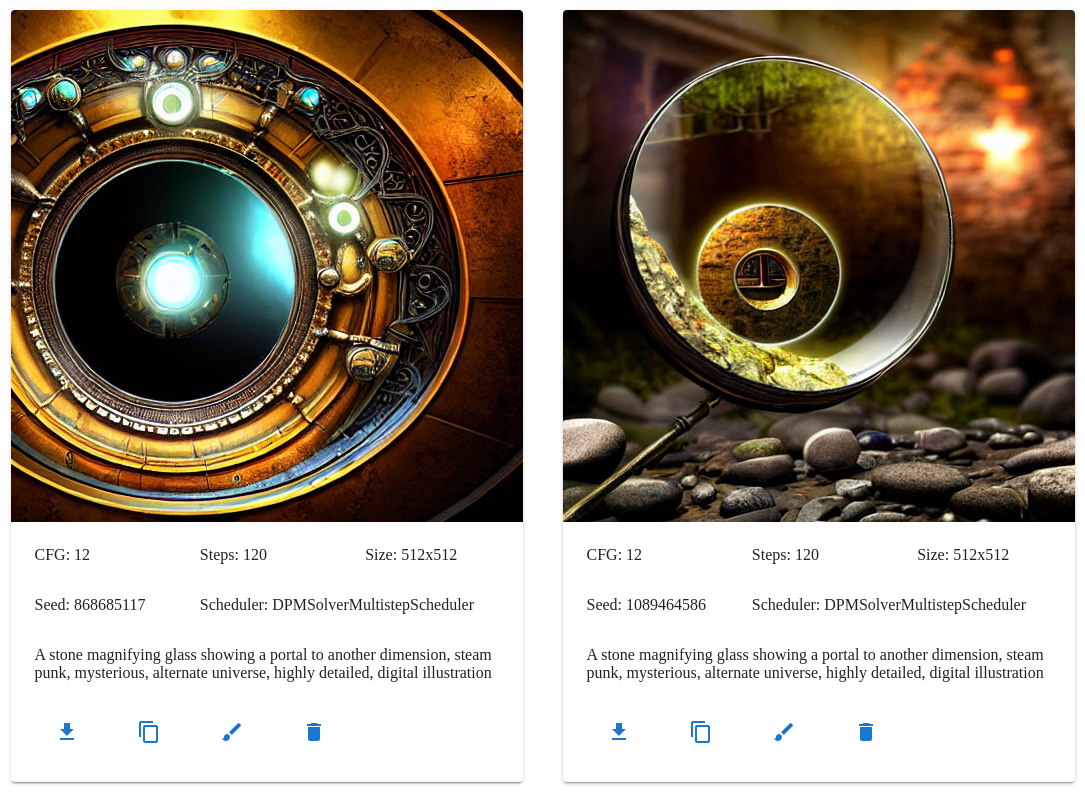
More complex scenes will often need more steps to get good results in the peripheral details.
Negative prompt parameter
The opposite of the prompt parameter, things that should not be included.
poorly drawn faces, poorly drawn hands, distorted
Width and height parameters
Controls the size of the output image, before upscaling.
Img2img tab
The img2img tab takes a source image along with the text prompt and produces a similar image. You can use the strength parameter to control the level of similarity between the source and output.
The output image will be the same size as the input, unless upscaling is turned on.
Img2img source image
Upload a source image for img2img.
Strength parameter
Blending strength. 0 uses the source image without changing it, 1 will replace it almost entirely.
Inpaint tab
The inpaint tab provides a way to edit part of an image and run the diffusion pipeline again, without editing the entire image. It still takes a text prompt, but uses a mask to decide which pixels should be regenerated.
The mask can be uploaded or edited directly in the browser. White pixels in the mask will be replaced with pixels from the noise source, then replaced again by the diffusion pipeline. Black pixels in the mask will be kept as they appeared in the source. The mask can use gray values to blend the difference.
When all of the options are used together, the process is:
- Add borders to the source image
- Generate the noise source from the source image and random data
- Run the mask filter on the mask image
- Blend the source image and the noise source using the mask image (pre-multiply)
- Apply the diffusion model to the source image using the mask image to weight pixels
- Apply the upscaling and correction models to the output
- Save the output
Inpaint source image
Upload a source image for inpaint.
Mask canvas and brush parameters
Upload or draw a mask image.
White pixels will be replaced with noise and then regenerated, black pixels will be kept as-is in the output.
- Fill with black
- Keep all pixels
- Fill with white
- Replace all pixels
- Invert
- Replace black pixels with white and vice versa
- If you accidentally painted a good mask in the wrong color, this can save it
- Gray to black
- Convert gray parts of the mask to black (keep them)
- Gray to white
- Convert gray parts of the mask to white (replace them)
Mask filter parameter
Mask filters are used to pre-process the mask before blending the source image with the noise and before running the diffusion pipeline.
- None
- no mask filter
- usually a fine option
- Gaussian Multiply
- blur and darken the mask
- good when you want to soften and expand the edges of the area to be kept
- Gaussian Screen
- blur and lighten the mask
- good when you want to soften and expand the edges of the area to be replaced
Noise source parameter
Noise sources are used to create new data for the next round of diffusion. Sometimes adding noise can improve the results, but it may also be too much. A variety of sources are provided.
- Fill Edges
- fill the edges of the image with a solid color
- only changes the image when used with outpainting
- Fill Masked
- fills the edges and masked areas of the image with a solid color
- Gaussian Blur
- blur the source image
- fills the edges with noise when used with outpainting
- a good option for finishing the edges of an image
- Histogram Noise
- fills the edges and masked area with noise matching the source color palette
- noise color is based on the color frequency in the source histogram
- a good option for continuing to build an image
- Gaussian Noise
- fills the edges and masked area with Gaussian noise
- Uniform Noise
- fills the edges and masked area with uniform noise
Outpaint parameters
The number of pixels to add in each direction.
Upscale tab
The upscale tab provides a dedicated way to upscale an image and run face correction using Real ESRGAN and GFPGAN, without running a diffusion pipeline at all. This can be faster and avoids making unnecessary changes to the image.
Resize the output image before returning it to the client.
Enabling this will run Real ESRGAN and requires an upscaling model.
Check out the Real ESRGAN Github for more details.
Scale parameter
The output scale for Real ESRGAN. This output will be rescaled using the outscale parameter.
Outscale parameter
The final output scale after running Real ESRGAN. This can increase or decrease the size of the final output. Lanczos interpolation is used when the outscale is greater than the scale.
Denoise parameter
The amount of denoising to apply when using the RealESR x4 v4 model. Can be used to avoid over-smoothing the results.
Face correction and strength
Run face correction the the output image before returning it to the client.
Enabling this will run GFPGAN and requires a correction model.
Check out the GFPGAN Github for more details.
Settings tab
The settings tab provides access to some of the settings and allows you to reset the state of the other tabs to the defaults, if they get out of control.
Image history setting
The image history setting allows you to change the number of images kept in the recent image history. If you are generating very large images or have limited memory, reducing this may improve performance. Increasing this will keep more images in history. Output is always kept on the server.
API server setting
Changing the API server will reload the client.
Reset tab buttons
Resets the state of each tab to the default, if some controls become glitchy.
Known Errors
This section attempts to cover all of the known errors and their solutions.
If you encounter an error that does not show up here, please open a Github issue and include as many details as possible. Screenshots of the client and logs from the server are especially helpful, and please include any stacktraces that appear in the server logs.
Client Errors
Error fetching server parameters
This can happen when the client cannot fetch the server parameters because the request times out or has been rejected by the server.
This often means that the requested API server is not running.
Parameter version error
This can happen when the version in the server parameters is too old for the current client or missing entirely, which was the case before version v0.5.0.
This often means that the API server is running but out-of-date.
Distorted and noisy images
This can happen when the selected diffusion or upscaling models are not trained for the current resolution or aspect ratio.
This often means that the scale parameter does not match the upscaling model.
Scattered image tiles
This can happen when the selected upscaling model is not trained for the current resolution.
This often means that the scale parameter does not match the upscaling model.
Server Errors
If your image fails to render without any other error messages on the client, check the server logs for errors (if you have access).
Very slow with high CPU usage, max fan speed during image generation
This can happen when you attempt to use a platform that is not supported by the current hardware.
This often means that you need to select a different platform or install the correct drivers for your GPU and operating system.
Example error:
loading different pipeline
C:\Users\ssube\stabdiff\onnx-web\api\onnx_env\lib\site-packages\onnxruntime\capi\onnxruntime_inference_collection.py:54: UserWarning: Specified provider 'CUDAExecutionProvider' is not in available provider names.Available providers: 'DmlExecutionProvider, CPUExecutionProvider'
The CPUExecutionProvider is used as a fallback, but has a tendency to max out all of your real CPU cores.
Connection refused or timeouts
This can happen in a few situations:
- when your API server is not running
- when your client is attempting to use the wrong API server
- when your firewall is blocking the API server's port
If you are using a remote server, not on your local machine, check the Settings tab and make sure the API Server is set to the correct DNS name or IP address and port number.
If you have a firewall running (which you should), make sure that the correct port has been opened and the API server is allowed to use that port.
The default ports are:
- TCP/5000 for the API server
If you are running the GUI separately, such as when using nginx or for development:
- TCP/80 for the GUI using nginx without a container
- TCP/8000 for the GUI using the nginx container
- TCP/3000 for the GUI dev server
Error: name 'cmd' is not defined
This can happen when you attempt to create the Python virtual environment on a Debian system, and appears to be a bug
in the Python venv module: https://www.mail-archive.com/debian-bugs-dist@lists.debian.org/msg1884072.html
Installing the venv module through apt appears to resolve the issue:
> sudo apt install python3-venv
CUDA driver version is insufficient for CUDA runtime version
This can happen when your CUDA drivers are too new or too old for the API server and ONNX runtime.
Make sure you are using CUDA 11.x drivers. The 11.6 version is recommended by ONNX, but 11.7 appears to work as well.
Please see the ONNX runtime docs for more details.
Command 'python' not found or Command 'pip' not found
This can happen when your operating system has both Python 2 and 3 installed and uses different commands to differentiate between them.
Using python3 and pip3 instead of python and pip in the commands should resolve this issue:
> pip3 install -r requirements.txt # for example, you may be running a different command
AttributeError: module 'numpy' has no attribute 'float'
This can happen when you have numpy 1.24 or a newer version installed. The float attribute has been deprecated and
was removed in 1.24. Some of the dependencies will automatically install the latest version, while others need a 1.23
version.
Reinstalling numpy 1.23 should resolve this issue:
> pip install "numpy>=1.20,<1.24" --force-reinstall
Numpy invalid combination of arguments
This can happen when you attempt to use an ONNX model that was exported using an older version of the ONNX libraries.
This often means that you need to re-export your models to ONNX format using the current version of the server and the libraries it depends on.
ONNXRuntimeError: The parameter is incorrect
This can happen in a few situations:
- when you attempt to use an inpainting model from the txt2img or img2img tabs, or vice versa
- when you attempt to use img2img with a non-square, non-power-of-2 source
This often means that you are using an invalid model for the current tab or an invalid source image for the current model.
Example error:
  File "C:\Users\ssube\stabdiff\onnx-web\api\onnx_web\pipeline.py", line 181, in run_inpaint_pipeline
    image = pipe(
  File "C:\Users\ssube\stabdiff\onnx-web\api\onnx_env\lib\site-packages\torch\autograd\grad_mode.py", line 27, in decorate_context
    return func(*args, **kwargs)
  File "C:\Users\ssube\stabdiff\onnx-web\api\onnx_env\lib\site-packages\diffusers\pipelines\stable_diffusion\pipeline_onnx_stable_diffusion_inpaint.py", line 427, in __call__
    noise_pred = self.unet(
  File "C:\Users\ssube\stabdiff\onnx-web\api\onnx_env\lib\site-packages\diffusers\onnx_utils.py", line 61, in __call__
    return self.model.run(None, inputs)
  File "C:\Users\ssube\stabdiff\onnx-web\api\onnx_env\lib\site-packages\onnxruntime\capi\onnxruntime_inference_collection.py", line 200, in run
    return self._sess.run(output_names, input_feed, run_options)
onnxruntime.capi.onnxruntime_pybind11_state.RuntimeException: [ONNXRuntimeError] : 6 : RUNTIME_EXCEPTION : Non-zero status code returned while running Conv node. Name:'/conv_in/Conv' Status Message: D:\a\_work\1\s\onnx
runtime\core\providers\dml\DmlExecutionProvider\src\MLOperatorAuthorImpl.cpp(1878)\onnxruntime_pybind11_state.pyd!00007FFB8404F72D: (caller: 00007FFB84050AEF) Exception(15) tid(2428) 80070057 The parameter is incorrect
The expanded size of the tensor must match the existing size
This can happen when you use an upscaling model that was trained at one specific scale with a different scale that it was not expecting.
This often means that you are using an invalid scale for the upscaling model you have selected.
Example error:
  File "C:\Users\ssube\stabdiff\onnx-web\api\onnx_web\upscale.py", line 155, in upscale_resrgan
    output, _ = upsampler.enhance(output, outscale=params.outscale)
  File "C:\Users\ssube\stabdiff\onnx-web\api\onnx_env\lib\site-packages\torch\autograd\grad_mode.py", line 27, in decorate_context
    return func(*args, **kwargs)
  File "C:\Users\ssube\stabdiff\onnx-web\api\onnx_env\lib\site-packages\realesrgan\utils.py", line 228, in enhance
    self.tile_process()
  File "C:\Users\ssube\stabdiff\onnx-web\api\onnx_env\lib\site-packages\realesrgan\utils.py", line 182, in tile_process
    self.output[:, :, output_start_y:output_end_y,
RuntimeError: The expanded size of the tensor (2048) must match the existing size (1024) at non-singleton dimension 3.  Target sizes: [1, 3, 2048, 2048].  Tensor sizes: [3, 1024, 1024]